
If you are using SteelSeries Engine software or hardware and it is not working properly, you should probably reinstall the drivers for hardware issues. However, when it comes to software issues with SteelSeries Engine 3 not detecting, there are a few steps that experts on gaming forums advocate. This post contains a compilation of all the best troubleshooting steps for working SteelSeries Engine 3 to function again in Windows 10.
How To Fix SteelSeries Engine 3 Not Working On Windows 10?
Clean Boot
According to experts, one of the causes of SteelSeries Engine 3 not working is a software clash with another software operating on your software. The best method to see if this is the case is to check a clean boot on your PC, restart your computer with the absolute minimum of Microsoft services and apps.
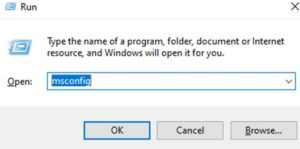
1 – Press Windows + R to make the RUN box, then type MSCONFIG and press the Enter key.
2 – In the new box that opens, click on the Services tab and click on the Hide All Microsoft Services option.
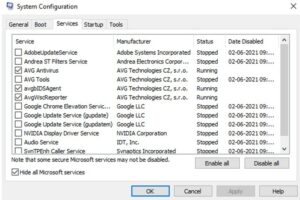
3 – Now, you need to uncheck all the services that belong to different software only. Realtek, NVIDIA, Intel, Logitech, AMD, and other hardware services should not be unchecked. Click Apply, then OK.
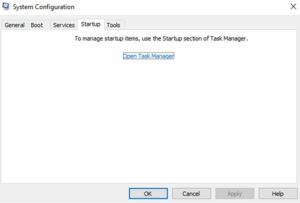
4 – In the same box, click on the Startup Tab and then the Open Task Manager option.
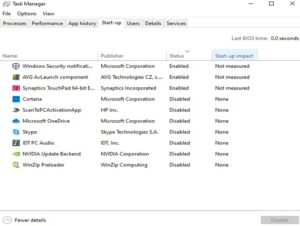
5 – When your computer boots, these programs startup. You may disable any apps you no longer require by right-clicking on them.
6 – Lastly, make a reboot and check if the SteelSeries Engine not opening issue has been fixed.
Note: If the SteelSeries Engine issue has been fixed, another piece of software on your PC is likely causing the conflict. You must manually turn on each app from the Services and Startup section and then check whether the issue persists.
Install Windows Updates
Like all other software companies, Microsoft publishes updates that improve the user experience and fix any existing bugs. Windows 10 has received frequent updates that enhance the operating system’s security and compatibility. Here are the steps to update Windows 10 and fix SteelSeries engine 3 not working:
1 – On your keyboard, press Windows and I to access the Settings window.
2 – Locate and click Update & Security.

3 – Click the Check For Updates button and wait until all of the updates are finished.

Please keep in mind that your system may restart a few times automatically.
Reinstall SteelSeries Engine
Errors that cannot be explained or the cause of which cannot be established are sometimes easily resolved by reinstalling the app. Forget to uninstall the old version of the software before attempting a reinstall. Take the following steps:
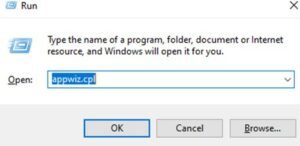
1 – To open the RUN box, press Windows + R and type appwiz. cpl.
2 – A list of your system’s installed apps will show on your screen. Locate SteelSeries Engine 3 and choose Uninstall.
3 – Follow the on-screen directions to uninstall the app from your computer.
4 – Go to the SteelSeries Official website and download the latest version of the app.

5 – Lastly, install the app and check if the SteelSeries Engine 3 not detecting issue has been resolved.
Conclusion: SteelSeries Engine 3 Not Working On Windows 10
That brings us to the end of our adventure on how to fix the SteelSeries Engine not opening on Windows 10. Numerous experts have advocated these steps on gaming forums and have worked for many people. You can try these steps and see whether the problem has been resolved after completing each method satisfactorily. You can skip the subsequent steps once the SteelSeries Engine 3 not detecting issue has been resolved.